")
")


I recently had the privilege of attending an amazing Harry Potter themed costume party. All the attendees went full-out in their costumes and the decorations were so elaborate and well done I felt like I was transported into Harry Potter’s World (Probably similar to Harry Potter’s own feeling when he first laid step into Hogwarts!)!
I had just gotten back from traveling and didn’t think I’d have the time or energy to make a creative costume. Before I resigned to wearing a black sheet as a robe, I looked through my closet, spotted my white long sleeve top and immediately thought, “Hedwig.” Harry Potter’s pet owl.

*Hedwig is a Snowy Owl. Her colors are Dominantly White with some Grey. I was originally going for white/grey with silver accents, but loved the taupe and decided to go white/taupe/brown. =)

I searched on Pinterest to see what others had done for Hedwig and although there were some really well done costumes, none of them were close to my interpretation. So I am happy to now share this option for others to use and translate into any bird costume!
If you are unsure of time I suggest setting yourself up for the best by gathering all materials and later returning anything unopened & unused. I didn’t realize I was going to get this far. The finished costume you see pictured was complete & ready to wear in less than 2 hours!

Materials Needed:
(Included the amount I paid and if able, links to the ones I used)1) *White Top or Blouse
2) 6 yards of 54″ Wide Tulle ($6.23)
4yds predominant color, 2yds secondary color
Can be found for affordable prices at Walmart or your local fabric store
3) 2 yards Pretty Ribbon ($4.00)
4) 1 sheet of 8×10” Felt ($0.49)
Can be found at your local craft store
5) 2-4 bags Feathers of choice (2 x @2.49 (-$1.00 coupon) = $3.98)
I used 2 bags of domestic goose feathers
6) Hot Glue Gun
7) Needle & Thread
8) Fabric Scissors
*You will need to wear shorts/skirt underneath this skirt
STEPS:

- Skirt
- TUTU:
- Materials used: Tulle & Ribbon
- There are several tulle skirt tutorials on youtube and pinterest. This is the No-Sew Method tutorial I used because I wanted a fluffy layered skirt to convey feathers of a bird.
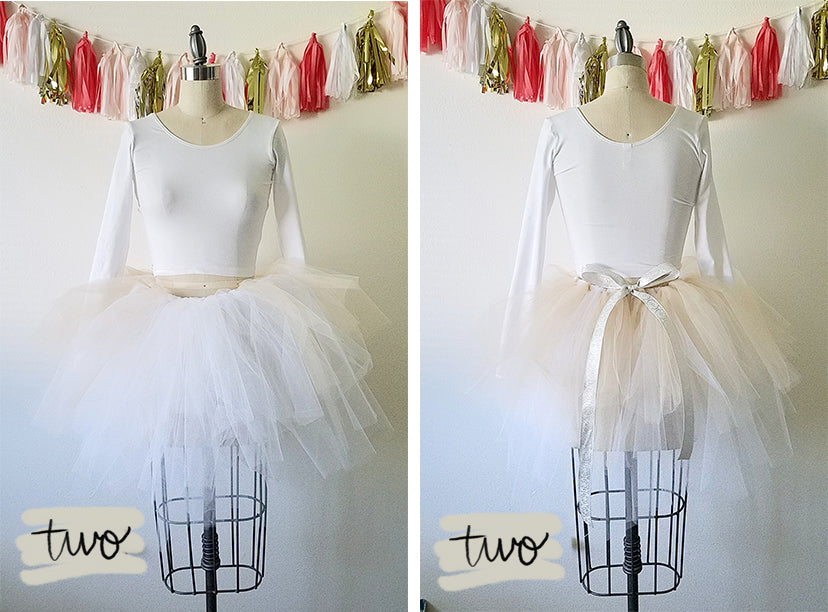
- I followed above technique for all of COLOR 1 first (See photo “one”), then used same technique for COLOR 2 placing where I wanted the color (See Front & Back in photos “two)
- TUTU:


2. Adding Feathers to shoulders:
- Materials used: Felt, Feathers, Glue Gun, Needle & Thread
- As you can see the back of the shoulder pads, I just roughly cut 2 shapes to the size I wanted. Edges don’t have to be perfect since it won’t be seen.
- Glue and Press feathers on in sections to desired fullness making sure feathers are all facing the same direction.
- With Needle and Thread, Make a single stitch where needed. I just put one towards the front and one towards the back. (No need to be sewn all the way down as these are to convey WINGS)


3. Adding Feathers to Skirt:
- Materials used: Felt, Feathers, Glue Gun, Needle & Thread
- Not Shown: I cut 2 strips of Felt about 1.5″ wide along the length of the 8×10 felt piece
- Follow same method used in the shoulder pads of Glueing & Pressing down feathers in the same direction. Do this in small sections as the hot glue dries quickly.
- Roughly Hand Stitch feather strip close to the waist of your skirt (see 2nd photo as proof it only need be rough stitches. They don’t show)
- Trim the stems of the feathers at the waist since they will stick out and poke you.
VOILA! You are done!

Time/Material Crunch Variations:
- No Top and Bottom to wear underneath? A dress will do! Just wear the skirt over the dress!
- Safety Pins vs Stitching: Instead of hand sewing, grab a handful of safety pins and pin from the underside!
If you have more time/money/resources:
- Masquerade Mask
- Beautiful Face paint
- More feathers for the skirt (I would’ve liked to have added more feathers to go down farther to be more visible. Perhaps 1-2 more packs.
- I don’t think wings are necessary if you have feathered shoulders. The simplicity is what keeps this elegant.
I hope you found this tutorial helpful and would love to see your version of the costume or tutu made posted in the comments! 🙂


+ show Comments
- Hide Comments
add a comment